StructFirst Core Guide #012
You saw price trade above a previous high and leave a long upper wick.
It looked like rejection, so you entered short.
Price hesitated for several candles, reclaimed the high, and continued toward the liquidity above it.
On another trade, price closed above resistance with a strong bullish candle. You bought the breakout, but the next candles returned inside the range and invalidated the move.
Neither loss necessarily came from failing to recognize the level.
The problem was acting on the first visible reaction before the market had completed the decision process.
A wick records an excursion. One close begins a test. Follow-through and structural consequence determine whether price rejected or accepted the level.
Acceptance and rejection are not isolated candlestick patterns.
They are processes involving location, liquidity, continued trade, displacement, structural consequence, retests, and failure logic.
The StructFirst sequence is:
Higher-Timeframe Structure
→ Relevant Level or Zone
→ Liquidity Interaction
→ Initial Wick or Close
→ Follow-Through
→ Reclaim or Acceptance
→ Structural Consequence
→ Invalidation
→ Execution
→ Target Liquidity
This process follows the broader methodology established in Why Market Structure Comes First: The StructFirst Trading Framework.
Quick Decision Summary
- A wick confirms that price traded beyond a level. It does not independently confirm rejection.
- One candle close beyond a boundary can begin an acceptance test. It does not complete it.
- Rejection requires failure to sustain beyond the level and a meaningful response away from it.
- Acceptance requires continued trade on the new side and evidence that the former boundary has changed function.
- Displacement and relevant structure breaks make either interpretation more credible.
- When price overlaps around the level without structural consequence, no-trade is valid.
1. The Trader’s Problem
Traders are often taught to read individual candles as completed messages.
A long upper wick is described as seller rejection. A long lower wick is described as buyer rejection. A close above resistance is described as a confirmed breakout.
These descriptions can identify an initial event, but they often remove the candle from the auction that follows it.
A long upper wick can precede:
- A confirmed bearish rejection.
- A temporary reaction before continuation higher.
- A liquidity sweep followed by range re-entry.
- A short consolidation before acceptance above resistance.
- An unresolved rotation with no directional conclusion.
A candle close above resistance can precede:
- Confirmed acceptance and continuation.
- A failed breakout.
- A stop run above the range.
- A one-candle volatility expansion.
- A return to equilibrium.
The first candle does not reveal which outcome will follow.
The trader must evaluate what the market does next.
Failing to make this distinction creates two recurring losses:
- Entering a reversal before rejection is confirmed.
- Chasing a breakout before acceptance is established.
The goal is not to wait until every move is over.
The goal is to require enough evidence that the risk can be defined before capital is committed.
2. What Are Acceptance and Rejection in Trading?
Rejection
Rejection occurs when price tests or trades beyond a meaningful level but fails to sustain trade on that side and produces a response away from the boundary.
Stronger rejection evidence may include:
- Liquidity access beyond the level.
- Failure to maintain candle-body closes outside the boundary.
- A decisive reclaim of the prior side.
- Displacement away from the level.
- A break of relevant structure.
- A failed reclaim during the retest.
- Continuation toward opposing liquidity.
Acceptance
Acceptance occurs when price trades beyond a meaningful boundary and continues building structure on the new side.
Stronger acceptance evidence may include:
- Candle-body closes beyond the boundary.
- Continued trade on the new side.
- Limited immediate return into the old range.
- Value or consolidation forming beyond the level.
- A successful retest.
- Continuation in the breakout direction.
- Failure of the opposing side to reclaim the previous range.
Rejection describes failure to remain beyond a boundary. Acceptance describes the market’s ability to continue trading on the new side.
Neither term guarantees a long-term trend reversal or continuation.
The significance depends on the timeframe, the level being tested, the liquidity involved, and the swing affected by the response.
3. Rejection Is a Process, Not a Wick
A wick shows that price traded beyond a reference and returned before the candle closed.
That information is useful, but incomplete.
The wick may represent:
- A liquidity sweep.
- Temporary volatility.
- Partial mitigation into a zone.
- A thin-liquidity excursion.
- A failed breakout.
- The beginning of confirmed rejection.
After the wick forms, ask:
- Where did the candle body close?
- Did the next candles reclaim the level or remain away from it?
- Did price establish sustained trade outside the boundary?
- Was displacement produced in the opposite direction?
- Which relevant swing was broken?
- Did a retest confirm the new function?
- Where is the next opposing liquidity objective?
A wick without bearish displacement or a relevant low break may produce only a temporary reaction.
A wick followed by failed acceptance, a decisive reclaim, bearish displacement, and a meaningful structural break provides stronger rejection evidence.
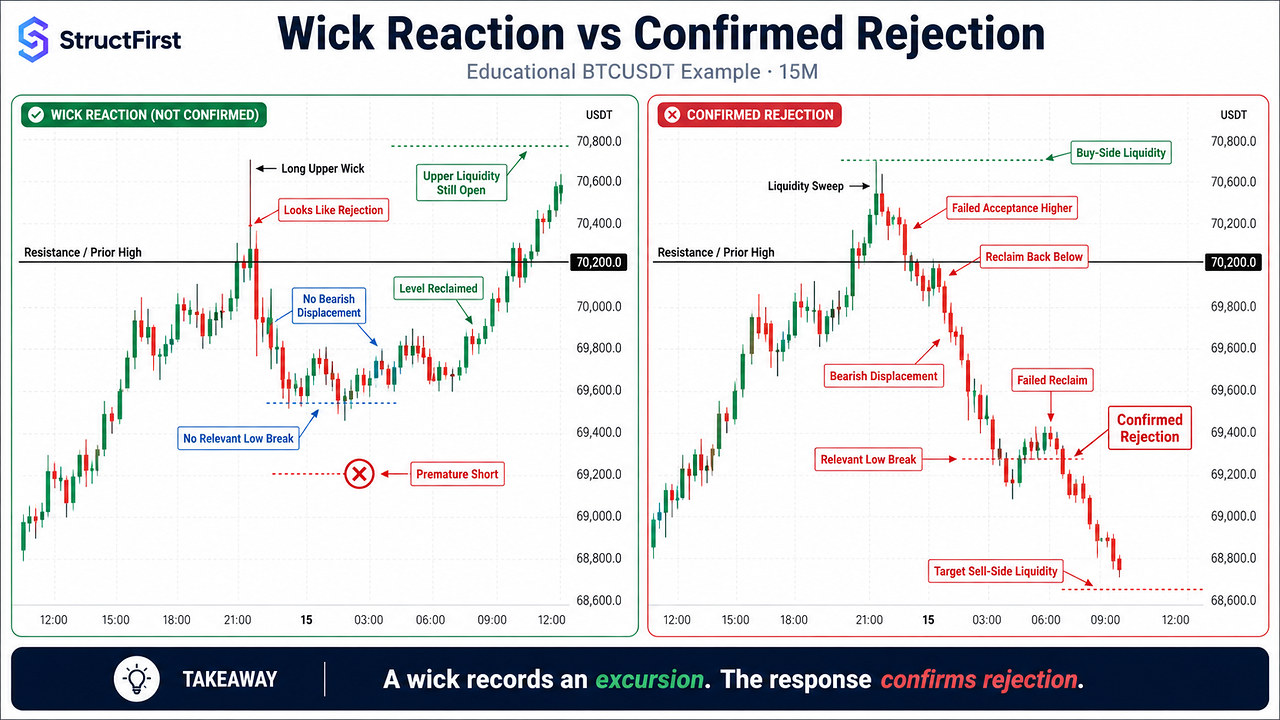
Both examples show price trading above resistance, but only one develops a defensible bearish rejection.
In the first example, the long upper wick creates the appearance of rejection, yet price does not produce bearish displacement or break meaningful structure. The level is later reclaimed, and upper liquidity remains open.
In the confirmed example, price accesses buy-side liquidity, fails to sustain trade above the boundary, and reclaims the prior side. Bearish displacement then breaks a relevant low, while the failed reclaim confirms that the former level is functioning as resistance.
The wick records the initial excursion. Follow-through and structural consequence determine whether rejection was confirmed.
4. Acceptance Is a Process, Not One Close
A candle-body close beyond resistance or support is more informative than a wick alone.
It still does not independently confirm acceptance.
One close beyond a boundary may be:
- The beginning of a genuine breakout.
- A temporary close outside the range.
- A news-driven expansion.
- A stop run.
- An incomplete auction.
- The first stage of a failed breakout.
A stronger acceptance sequence is:
Boundary Break
→ Candle-Body Close Beyond
→ Continued Trade on the New Side
→ Value Formation
→ Successful Retest
→ Structural Progression
A failed acceptance sequence may look like:
Boundary Break
→ One Close Beyond
→ No Follow-Through
→ Return Inside the Range
→ Failed Reclaim
→ Opposite Displacement
The first close begins the test.
The next part of the auction determines whether the market can hold the new location.
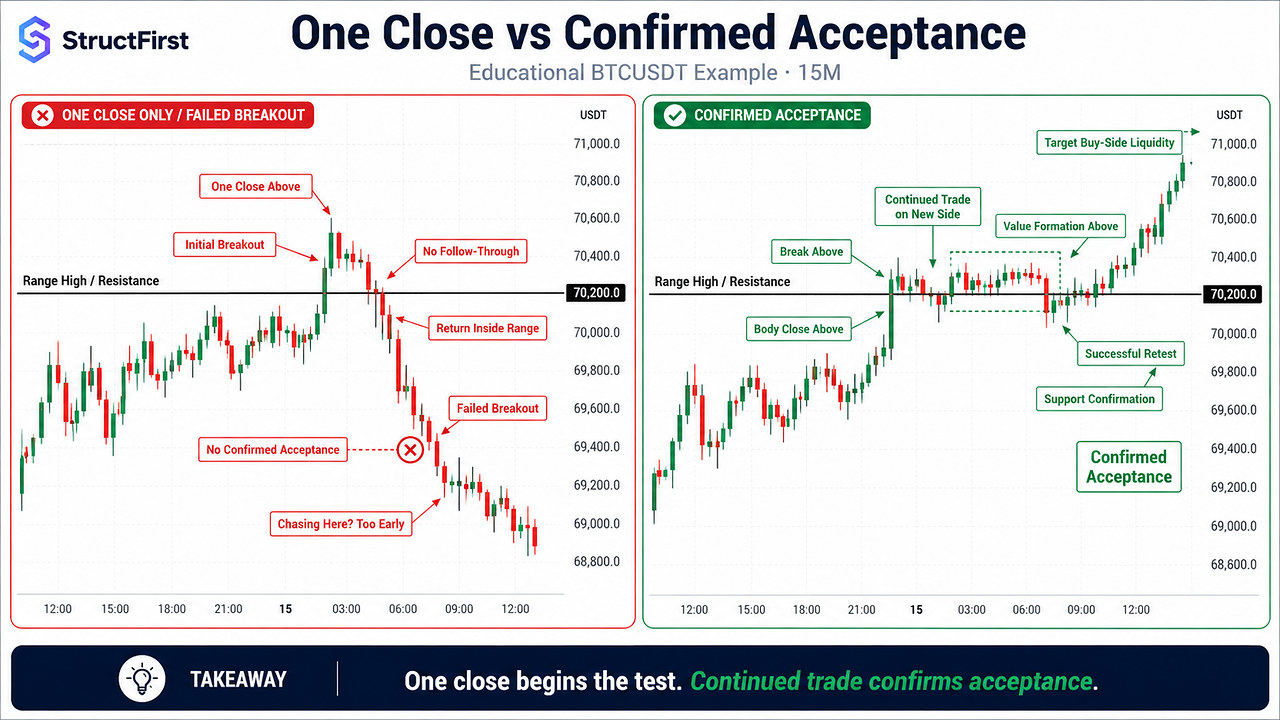
Both examples begin with price closing above resistance, but only one develops confirmed acceptance.
In the failed example, the breakout lacks follow-through. Price quickly returns inside the previous range, and the first close does not create a durable change in trade location.
In the confirmed example, price continues to trade above the boundary, forms value on the new side, and successfully retests the former resistance as support before continuing toward upper liquidity.
A close beyond the boundary begins the acceptance test. Sustained trade and successful defense complete it.
5. Temporary Reaction vs Confirmed Rejection
| Temporary Reaction | Confirmed Rejection |
|---|---|
| A wick or short-term response appears | Price fails to sustain beyond the boundary |
| Follow-through is limited | The prior side is decisively reclaimed |
| Relevant structure remains intact | Opposite displacement develops |
| The level may be reclaimed quickly | A relevant swing is broken |
| The response may remain internal | The response changes structural delivery |
| Invalidation is unclear | Failure logic can be defined |
| Opposing liquidity may remain open | Price progresses toward opposing liquidity |
A reaction becomes structurally useful when it reduces the market’s ability to continue through the tested level.
This does not require every rejection to create a full higher-timeframe reversal.
A fifteen-minute rejection may confirm only a local rotation while the four-hour trend remains intact.
6. Initial Break vs Confirmed Acceptance
| Initial Break | Confirmed Acceptance |
|---|---|
| Price wicks or closes beyond the level once | Price continues trading on the new side |
| Follow-through remains uncertain | Value begins forming beyond the boundary |
| A retest may be absent | The retest holds or the breakout continues decisively |
| Structural consequence may be limited | Relevant structure progresses in the breakout direction |
| Price may return inside the range | The old side becomes difficult to reclaim |
| Execution risk is unclear | Invalidation can be defined around the new structure |
Acceptance does not always require a textbook retest.
A strong market may break and continue without returning immediately.
In that situation, the directional read may be valid while the execution opportunity is already inefficient.
Direction and execution should not be confused.
7. Liquidity Sweep vs Rejection
A liquidity sweep and a rejection are related but different.
The sweep confirms that price traded through a visible liquidity reference.
It does not confirm what price will do after accessing that liquidity.
Sweep and Rejection
Liquidity Access
→ Failed Hold Beyond the Level
→ Reclaim
→ Opposite Displacement
→ Relevant Structure Break
Sweep and Continuation
Liquidity Access
→ Continued Trade Beyond the Level
→ Retest or Consolidation
→ Acceptance
→ Continuation
Sweep Without Resolution
Liquidity Access
→ Range Re-entry
→ Overlap
→ No Displacement
→ No Structural Consequence
A sweep is therefore an event requiring interpretation, not a reversal signal.
The complete framework is explained in What Is a Liquidity Sweep? Confirmation, Failure, and Execution.
8. Acceptance Beyond a Range Boundary
A range breakout should be evaluated through the market’s behavior beyond the boundary.
Ask:
- Did price only wick beyond the range?
- Did a candle body close outside?
- Did subsequent candles continue trading outside?
- Did the market form structure on the new side?
- Did the boundary hold during a retest?
- Did displacement continue toward external liquidity?
- Did price return inside the range and remain there?
A valid breakout can continue without an immediate retest.
However, entering after extensive continuation may offer poor asymmetry because the nearest liquidity target may already be close.
Acceptance can validate direction while still offering no efficient entry.
9. Acceptance and Rejection at Fair Value Gaps
Price entering a Fair Value Gap does not independently confirm that the imbalance held or failed.
A reaction at the edge or midpoint is only initial evidence.
Potential FVG Rejection
- Price enters the gap.
- Trade fails to sustain through the imbalance.
- Price displaces away.
- Relevant lower-timeframe structure breaks.
- The retest fails to reclaim the gap.
Potential FVG Acceptance
- Candle bodies trade through the gap.
- Price remains on the invalidating side.
- The displacement origin or protected swing fails.
- A retest confirms the new side.
- Continuation develops against the original FVG thesis.
An initial reaction does not prove that the FVG held.
The full imbalance framework is explained in How to Read a Fair Value Gap in Market Structure.
10. Acceptance and Rejection at Order Blocks
An Order Block touch is not rejection.
It is a test of whether the origin remains structurally relevant.
Order Block Rejection
- Price mitigates the zone.
- Trade fails to establish acceptance through it.
- Displacement develops away from the origin.
- A relevant swing breaks.
- The protected structure remains intact.
Order Block Acceptance and Failure
- Repeated candle bodies trade through the zone.
- The original displacement origin is lost.
- The recovery fails.
- Opposite displacement develops.
- Price continues on the invalidating side.
The zone provides the location.
The response determines whether the zone remained valid.
11. Displacement Confirms the Response
Displacement helps distinguish a meaningful response from ordinary fluctuation.
Useful evidence may include:
- Expanded candle bodies.
- Reduced candle overlap.
- Rapid movement away from the tested level.
- A Fair Value Gap or visible imbalance.
- A break of a relevant swing.
- Continued acceptance away from the boundary.
- Protection of the new displacement origin.
A long wick followed by overlapping candles may show a reaction without confirming control.
A close beyond resistance followed by immediate hesitation may begin an acceptance test without completing it.
The market reacted, but control was not confirmed.
The difference between expansion and genuine structural displacement is explained in What Is Displacement in Trading? Why Strong Candles Alone Are Not Enough.
12. BOS, CHoCH, and MSS After a Level Interaction
CHoCH
A CHoCH may show that the immediate sequence weakened after a rejection or acceptance event.
It does not automatically confirm a higher-timeframe reversal.
BOS
A BOS may confirm continuation after acceptance or structural progression after rejection.
Its importance depends on the swing being broken.
Market Structure Shift
A more credible shift generally includes:
- Failure of a relevant protected swing.
- Displacement in the new direction.
- Acceptance beyond the broken structure.
- A retest or failed reclaim.
- Follow-through toward new liquidity.
The complete distinction is explained in BOS vs CHoCH vs Market Structure Shift: What Actually Confirms a Trend Change?.
13. Multi-Timeframe Acceptance and Rejection
The same level can produce different readings on different timeframes.
For example:
- A five-minute chart may show a bearish rejection.
- A one-hour candle may still close above resistance.
- A four-hour chart may continue establishing value above the range.
The five-minute rejection may create a short-term pullback without invalidating the higher-timeframe acceptance.
The reverse is also possible.
A five-minute breakout may appear bullish while the one-hour market continues rejecting a higher-timeframe resistance area.
Lower-timeframe rejection cannot automatically override higher-timeframe acceptance.
Before executing, determine which swing and timeframe control the planned trade. The hierarchy is explained in Internal vs External Market Structure: Which Swing Actually Controls the Trend?.
14. Acceptance and Rejection Invalidation
Bearish Rejection Thesis Failure
A bearish rejection thesis may fail when price:
- Establishes acceptance above the rejected level.
- Recovers the protected high.
- Erases the bearish displacement origin.
- Confirms former resistance as support.
- Continues toward upper liquidity.
Bullish Rejection Thesis Failure
A bullish rejection thesis may fail when price:
- Establishes acceptance beneath the rejected level.
- Loses the protected low.
- Erases the bullish displacement origin.
- Fails to reclaim the boundary.
- Continues toward lower liquidity.
Acceptance Thesis Failure
An acceptance thesis may fail when:
- Price returns to the previous side of the boundary.
- Trade remains inside the old range.
- The retest of the breakout side fails.
- Opposite displacement develops.
- The breakout origin is invalidated.
Invalidation should be defined before the entry.
It should explain why the interpretation failed—not merely identify where the preferred reward-to-risk ratio stops working.
15. A Practical Acceptance and Rejection Execution Framework
Use the following sequence before committing risk:
- Define the higher-timeframe structure.
- Identify the level or zone being tested.
- Mark the liquidity beyond that level.
- Observe the initial wick, close, or penetration.
- Wait for reclaim or continued trade.
- Evaluate displacement.
- Identify the relevant structure affected.
- Observe the retest or failed reclaim.
- Define invalidation.
- Identify the next liquidity target.
- Reject the trade when the remaining reward does not justify the risk.
The full operational sequence is:
HTF Structure
→ Relevant Level
→ Liquidity Positioning
→ Initial Interaction
→ Reclaim or Acceptance
→ Displacement
→ Structural Confirmation
→ Retest
→ Invalidation
→ Entry
→ Target Liquidity
→ Risk Management
Do not enter automatically at the first wick.
Do not chase automatically after the first close.
16. Common Acceptance and Rejection Mistakes
- Treating every long wick as rejection. The wick confirms an excursion, not control.
- Treating one close as acceptance. Continued trade and structural progression remain necessary.
- Treating every liquidity sweep as reversal. Price can accept beyond the swept level and continue.
- Promoting a temporary reaction into a trend reversal. The controlling structure may remain intact.
- Chasing the first breakout candle. The entry may occur before the market proves that the new side can hold.
- Ignoring the retest. A retest can confirm or invalidate the proposed role transition.
- Using lower-timeframe rejection against higher-timeframe acceptance. The signal may describe only a local pullback.
- Calling an Order Block touch confirmed defense. The subsequent response determines validity.
- Treating an FVG fill as automatic failure. Acceptance through the supporting structure matters more.
- Forcing a trade during unresolved overlap. No-trade is a valid conclusion.
17. What This Framework Helps You Avoid
- Shorting every long upper wick.
- Buying every breakout close.
- Repeated failed-breakout losses.
- Confusing liquidity access with reversal confirmation.
- Confusing temporary reaction with structural rejection.
- Ignoring acceptance after the original bias fails.
- Using lower-timeframe noise to override external structure.
- Entering before invalidation can be defined.
- Trading when the market has not completed the decision process.
This framework does not guarantee that every confirmed rejection or acceptance will continue.
Its purpose is to remove lower-quality interpretations before capital is committed and to make failure easier to recognize afterward.
18. Practice Drill: Classify the Market Response
Review 30 historical BTCUSDT level interactions and record:
- The higher-timeframe structure.
- The function of the tested level.
- The liquidity positioned beyond it.
- Whether the initial event was a wick, close, or extended trade.
- Where the candle body closed.
- What occurred during the next three to five candles.
- Whether price reclaimed the prior side.
- Whether price continued trading on the new side.
- Whether displacement appeared.
- Which meaningful swing was broken.
- Whether a retest succeeded or failed.
- The invalidation visible at the time.
- The next target liquidity.
- The final classification.
Use one of five classifications:
- Temporary reaction.
- Confirmed rejection.
- Initial break.
- Confirmed acceptance.
- Unresolved / no-trade.
What did the market do after the first reaction?
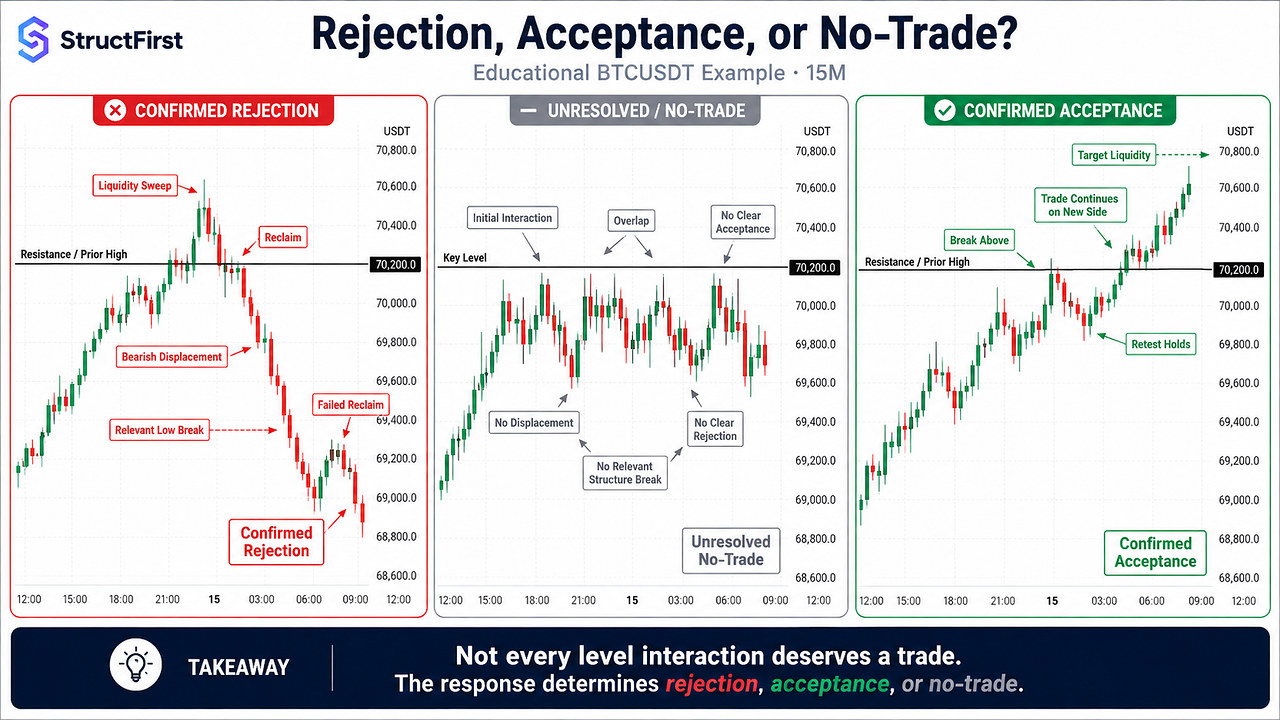
Price interacting with a level does not automatically create a trade.
The first example confirms rejection because price fails to sustain beyond the boundary, reclaims the prior side, displaces away, and breaks relevant structure.
The middle example remains unresolved. Price overlaps around the level without meaningful displacement, a durable reclaim, or a relevant structure break. In this environment, no-trade is the more professional decision.
The final example confirms acceptance because price continues to trade on the new side, holds the retest, and progresses toward the next liquidity objective.
A level interaction is only the beginning. The response determines whether the market rejected, accepted, or remained unresolved.
19. No-Trade Conditions
No-trade is appropriate when:
- The structural function of the level is unclear.
- The wick produces no follow-through.
- Only one close exists beyond the boundary.
- Price overlaps repeatedly around the level.
- Lower and higher timeframes provide conflicting evidence.
- Displacement is absent.
- No relevant structure break occurs.
- The reclaim or retest remains incomplete.
- Invalidation cannot be defined clearly.
- The target liquidity is too close.
- Price has already moved too far from the efficient entry.
- The trade requires guessing whether the market rejected or accepted the level.
An unresolved response is not a requirement to choose a direction.
It is a reason to stay flat.
20. The StructFirst Acceptance and Rejection Decision Framework
Before trading a level interaction, ask:
- What structural function does the level serve?
- Which timeframe controls the trade?
- What liquidity sits beyond the boundary?
- Did price wick through, close through, or continue trading through?
- Where did the candle body close?
- Did price reclaim the previous side?
- Did price remain on the new side?
- Was displacement produced?
- Which meaningful swing was broken?
- Did the retest confirm the new function?
- What invalidates the interpretation?
- Where is the next liquidity target?
- Does the opportunity justify the required risk?
- Is the response confirmed enough to trade?
- Would no-trade be the more professional decision?
Frequently Asked Questions
Does a Long Wick Always Mean Rejection?
No. A long wick confirms that price traded beyond a reference and returned before the candle closed. Rejection requires evidence that price failed to sustain beyond the level and produced a meaningful response away from it.
Does One Candle Close Confirm Acceptance?
Not automatically. One close can begin the acceptance test. Continued trade, value formation, a successful retest, and structural progression provide stronger confirmation.
Is a Liquidity Sweep the Same as Rejection?
No. A liquidity sweep is the event of price trading through a liquidity reference. Rejection is one possible response after the sweep. Price may also accept beyond the level and continue.
Does Acceptance Require a Retest?
No. Price can establish acceptance and continue without an immediate retest. However, a successful retest often provides clearer execution and invalidation.
Can Rejection Occur Without Reversing the Trend?
Yes. A lower-timeframe rejection can create a temporary rotation while the higher-timeframe structure remains unchanged.
What Should I Do When Acceptance and Rejection Are Both Unclear?
Remain flat until the market produces displacement, a meaningful structural consequence, or another clear confirmation. No-trade is a valid analytical conclusion.
Continue the Learning Path
- Why Market Structure Comes First: The StructFirst Trading Framework
- What Is a Liquidity Sweep? Confirmation, Failure, and Execution
- What Is Displacement in Trading? Why Strong Candles Alone Are Not Enough
- Internal vs External Market Structure: Which Swing Actually Controls the Trend?
- How to Read a Fair Value Gap in Market Structure
- BOS vs CHoCH vs Market Structure Shift: What Actually Confirms a Trend Change?
Expand Your Structural Edge
The first candle does not complete the market’s decision.
A wick confirms that price explored beyond a level.
A close confirms that price ended one candle on the new side.
Neither observation independently confirms control.
Rejection requires failure to sustain beyond the boundary and a meaningful response away from it.
Acceptance requires the market to continue trading on the new side and preserve the structural consequence.
When neither outcome is confirmed, no-trade protects both capital and analytical discipline.
Read the response before trading the label.
Track the live order flow and volume footprint yourself directly on TradingView.
Leave a Reply