StructFirst Core Guide #013
You marked a pullback zone after a strong move, waited for price to return, and entered because the area looked like a Mitigation Block.
Price reacted briefly.
Then it traded through the zone and continued in the direction you expected to fail.
The problem was not necessarily the rectangle.
The problem was that the market had never completed the structural sequence required to make the failed leg meaningful.
A pullback alone does not create a Mitigation Block.
A directional swing must first fail. Opposite displacement must then produce structural consequence. Only after that sequence does the return to the failed leg become a potential execution location.
Every Mitigation Block includes a pullback. Not every pullback is a Mitigation Block.
The StructFirst sequence is:
Higher-Timeframe Structure
→ Liquidity Objective
→ Expected Swing Continuation
→ Failure to Swing
→ Opposite Displacement
→ Relevant Structure Break
→ Mitigation Area
→ Retest
→ Confirmation
→ Invalidation
→ Execution
→ Target Liquidity
This process follows the broader methodology established in Why Market Structure Comes First: The StructFirst Trading Framework.
Quick Decision Summary
- A Mitigation Block is not every pullback into an opposing candle or prior price area.
- The setup begins with failure of an expected directional swing.
- Opposite displacement must affect structure that matters to the planned trade.
- The failed leg becomes relevant only after structural consequence is confirmed.
- A return to the area provides location, not automatic execution.
- Acceptance, rejection, protected structure, and failed-reclaim behavior determine whether the setup remains valid.
- Invalidation must be defined before the target.
- When swing failure or structural consequence is unclear, no-trade is valid.
1. The Trader’s Problem
Mitigation Block trading becomes confusing because many chart movements contain the same visual ingredients:
- A directional move.
- A pullback.
- An opposing candle or small consolidation.
- A return into the prior price area.
- A temporary reaction from the zone.
Those ingredients can appear during an ordinary retracement, trend continuation, Order Block mitigation, Breaker formation, range rotation, or a genuine Mitigation Block sequence.
The visual similarity encourages traders to begin with the rectangle rather than with the structural problem.
They ask:
Which candle is the Mitigation Block?
The more useful questions are:
- What directional continuation was expected?
- Which swing failed to complete that continuation?
- Did opposite displacement develop?
- Which meaningful swing did that displacement break?
- Where did the failed directional leg begin?
- What must happen during the return to confirm the area?
- What behavior would prove that the Mitigation Block thesis failed?
Without those answers, the label may create confidence without creating defensible risk.
2. Why Mitigation Block Definitions Become Confusing
The term “mitigation” is used in several different ways across trading education.
It may describe:
- Price returning to an Order Block.
- A retracement into a displacement origin.
- A revisit of a Fair Value Gap.
- A failed directional leg that becomes relevant after a structural shift.
- A general assumption that earlier orders are being reduced or balanced.
These ideas should not be treated as interchangeable.
Order Block Mitigation
Order Block mitigation describes price returning to an area associated with an earlier displacement origin.
The return tests whether the original area remains structurally relevant.
Mitigation Block
A Mitigation Block, as used in this guide, is connected to failure of an expected directional swing.
Opposite displacement then breaks meaningful structure, and the failed directional leg becomes relevant when price returns to it.
Breaker Block
A Breaker Block begins with failure of an established Order Block or defended structural zone.
Price accepts through the area and later tests it from the opposite side, confirming a possible role transition.
Mitigation is an action. A Mitigation Block is a specific structural setup.
The terminology should help describe observable market behavior. It should not replace the evidence required to trade the area.
3. What Is a Mitigation Block in Trading?
A practical StructFirst definition is:
A Mitigation Block is a price area associated with a failed directional swing that becomes structurally relevant after opposite displacement breaks meaningful structure and price later returns to the failed leg.
This definition contains four required elements.
1. Expected Directional Continuation
The market must first have a recognizable directional sequence.
A bullish market may be expected to create another higher high. A bearish market may be expected to create another lower low.
2. Failure to Swing
The expected continuation does not complete.
A bullish rally may fail to create a higher high. A bearish decline may fail to create a lower low.
3. Opposite Structural Consequence
Failure alone is insufficient.
Price must displace in the opposite direction and affect a swing relevant to the planned trade.
4. Return to the Failed Leg
Price later returns toward the failed directional leg or its structural origin.
The return creates a candidate execution location, but the response must still confirm whether the area is defended, rejected, or accepted through.
The Mitigation Block does not create the directional thesis by itself.
It refines a transition already supported by swing failure, displacement, and structural consequence.
4. What Failure to Swing Actually Means
Failure to swing describes the market’s inability to complete the directional structure that the current sequence implied.
Bearish Mitigation Candidate
In a bullish sequence:
- Price is forming higher highs and higher lows.
- A new rally is expected to create another higher high.
- The rally fails below or near the prior high.
- A lower high or failed rally develops.
- Bearish displacement breaks the higher low supporting bullish delivery.
Bullish Mitigation Candidate
In a bearish sequence:
- Price is forming lower lows and lower highs.
- A new decline is expected to create another lower low.
- The decline fails above or near the prior low.
- A higher low or failed decline develops.
- Bullish displacement breaks the lower high supporting bearish delivery.
A failed higher high or lower low is an early warning.
It does not independently confirm a reversal, a Mitigation Block, or an entry.
The opposite displacement and the structure it breaks determine whether the failure becomes meaningful.
5. How a Bearish Mitigation Block Forms
A bearish Mitigation Block begins inside a previously bullish structure.
The complete formation sequence is:
Bullish Structure
→ Expected Higher High
→ Failure to Continue
→ Lower High
→ Bearish Displacement
→ Relevant Higher Low Break
→ Failed Bullish Leg
→ Retest
→ Bearish Confirmation
The bullish sequence should be recognizable before the failure occurs.
If the market is already ranging without clear directional expectation, describing a minor lower high as failure to swing may add a label without adding useful information.
The bearish displacement should then break a higher low that supported the bullish sequence.
Breaking a tiny micro low may weaken a lower-timeframe entry without invalidating the broader bullish structure.
The hierarchy between internal and external swings is explained in Internal vs External Market Structure: Which Swing Actually Controls the Trend?.
After the relevant break, the failed bullish leg can be marked as the potential Mitigation Block area.
When price returns, the trader should evaluate whether the area produces:
- Failure to maintain acceptance above the zone.
- Lower-timeframe bearish displacement.
- A relevant internal structure break.
- A failed reclaim.
- Preservation of the protected high.
- Continued delivery toward lower liquidity.
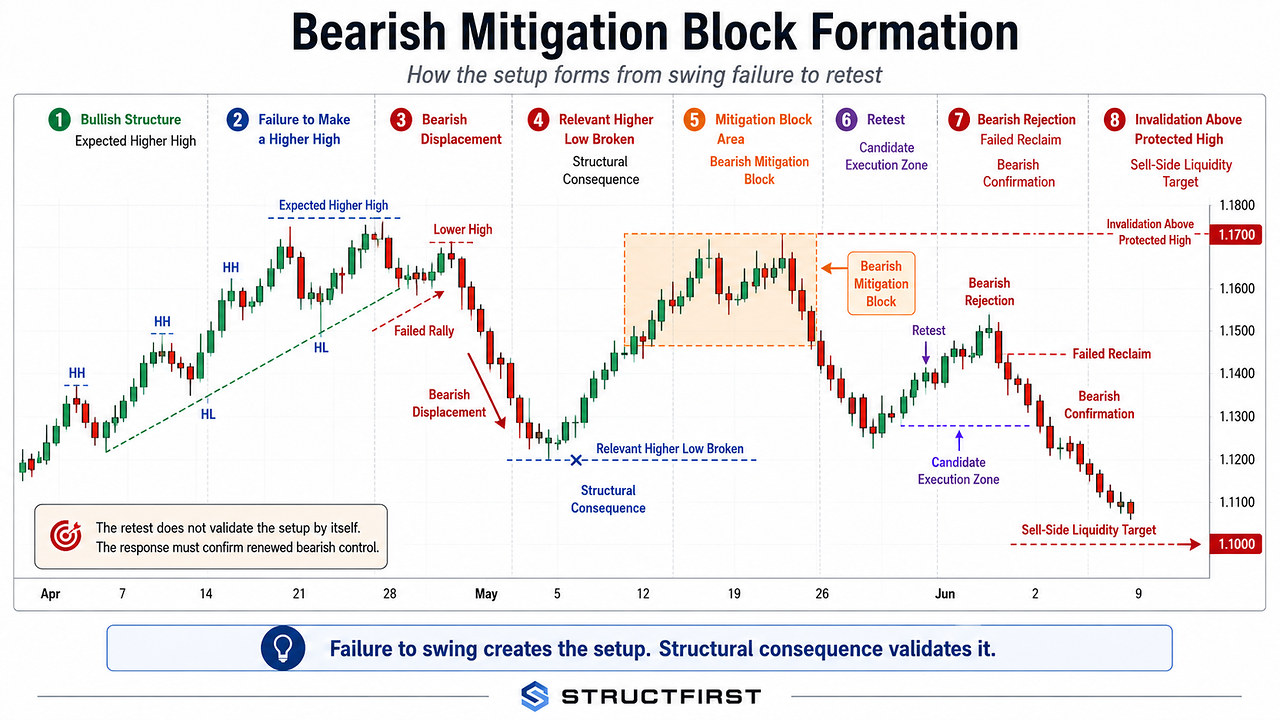
The sequence begins with established bullish structure and an expectation that price will create another higher high.
The setup does not begin simply because price pauses or prints a lower high. Bearish displacement must create structural consequence by breaking the higher low supporting the bullish sequence.
Only after that break does the failed bullish leg become a meaningful Mitigation Block candidate.
The later retest provides location, but the retest alone does not confirm execution.
Bearish rejection, a failed reclaim, and continued delivery toward sell-side liquidity provide stronger evidence that the failed leg remains structurally relevant.
6. How a Bullish Mitigation Block Forms
A bullish Mitigation Block develops through the opposite sequence:
Bearish Structure
→ Expected Lower Low
→ Failure to Continue
→ Higher Low
→ Bullish Displacement
→ Relevant Lower High Break
→ Failed Bearish Leg
→ Retest
→ Bullish Confirmation
A bearish decline must first fail to complete the lower-low sequence expected by the controlling structure.
Bullish displacement must then break the lower high that preserves bearish delivery.
Only after that structural consequence does the failed bearish leg become a potential bullish Mitigation Block.
During the return, bullish confirmation may include:
- Failure to remain below the mitigation area.
- A decisive reclaim of the zone.
- Bullish displacement away from the area.
- A lower-timeframe high break.
- Protection of the new bullish low.
- Continuation toward buy-side liquidity.
A failed decline near sell-side liquidity can improve the location.
It does not remove the need for structural confirmation.
A liquidity sweep is an event rather than a completed reversal. The distinction is explained in What Is a Liquidity Sweep? Confirmation, Failure, and Execution.
7. Ordinary Pullback vs Mitigation Block
An ordinary pullback and a Mitigation Block retest can look similar after the outcome is known.
The structural sequence before the return creates the distinction.
| Ordinary Pullback | Mitigation Block Candidate |
|---|---|
| Occurs inside an intact directional sequence | Follows failure of expected directional continuation |
| No failure swing may be present | A failed high or low is clearly identifiable |
| Opposite displacement may be weak or absent | Opposite displacement changes delivery |
| Relevant structure remains intact | A meaningful supporting swing is broken |
| The pullback may support continuation | The failed leg may become a retest location |
| No new functional role is confirmed | The retest may confirm a new resistance or support function |
| Invalidation remains tied to the original trend | Invalidation is tied to the new transition structure |
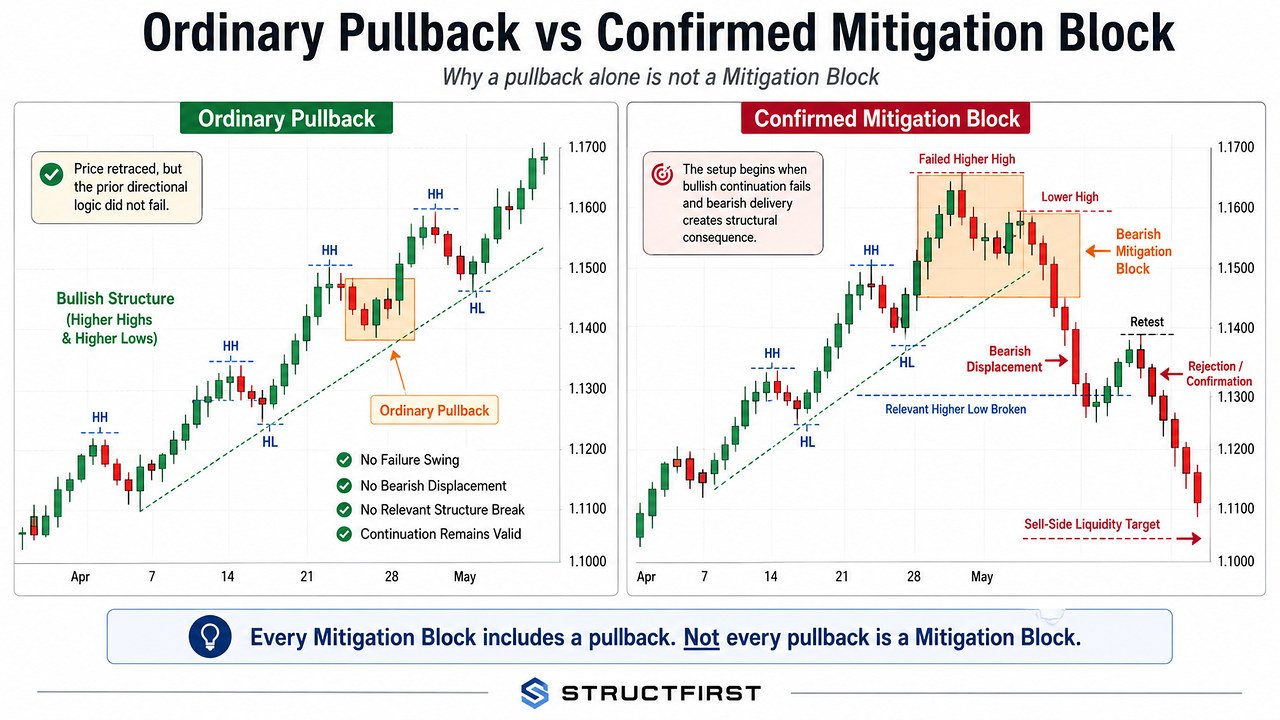
Both examples contain a pullback, but the structural meaning is different.
In the ordinary pullback, price retraces while the bullish sequence remains intact. No continuation swing fails, bearish displacement is absent, and the relevant higher low remains protected.
In the Mitigation Block example, bullish continuation fails before bearish displacement breaks meaningful structure.
The failed bullish leg becomes relevant only after price returns to the area and confirms renewed bearish delivery.
The shape of the retracement does not create the setup. Directional failure and structural consequence do.
8. Mitigation Block vs Order Block
Order Blocks and Mitigation Blocks may overlap, but they answer different structural questions.
| Order Block | Mitigation Block |
|---|---|
| References the origin of meaningful displacement | References a failed directional leg after structural transition |
| Supports the original directional move | Becomes relevant after the original direction fails |
| Mitigation tests whether the origin remains defended | Retest evaluates whether the failed leg controls the new direction |
| Formation begins with displacement | Formation begins with failure to swing and opposite displacement |
| The protected swing supports the original thesis | A new protected swing supports the transition thesis |
An Order Block should be evaluated through location, liquidity, displacement, structural consequence, mitigation, and invalidation.
The complete framework is explained in What Is an Order Block in Trading? Why the Last Opposing Candle Is Not Enough.
A return to an Order Block is mitigation of the original zone.
That action should not automatically be relabeled as a Mitigation Block setup.
9. Mitigation Block vs Breaker Block
Mitigation Blocks and Breaker Blocks can both produce retests after a structural transition.
The starting failure is different.
| Mitigation Block | Breaker Block |
|---|---|
| Begins with failure of a directional swing | Begins with failure of an established structural zone |
| Expected continuation does not complete | An Order Block or defended area fails |
| Opposite displacement breaks meaningful structure | Price establishes acceptance through the original zone |
| The failed leg becomes the retest area | The failed zone becomes the retest area |
| Execution tests whether the failed leg remains relevant | Execution tests whether the zone confirmed a role transition |
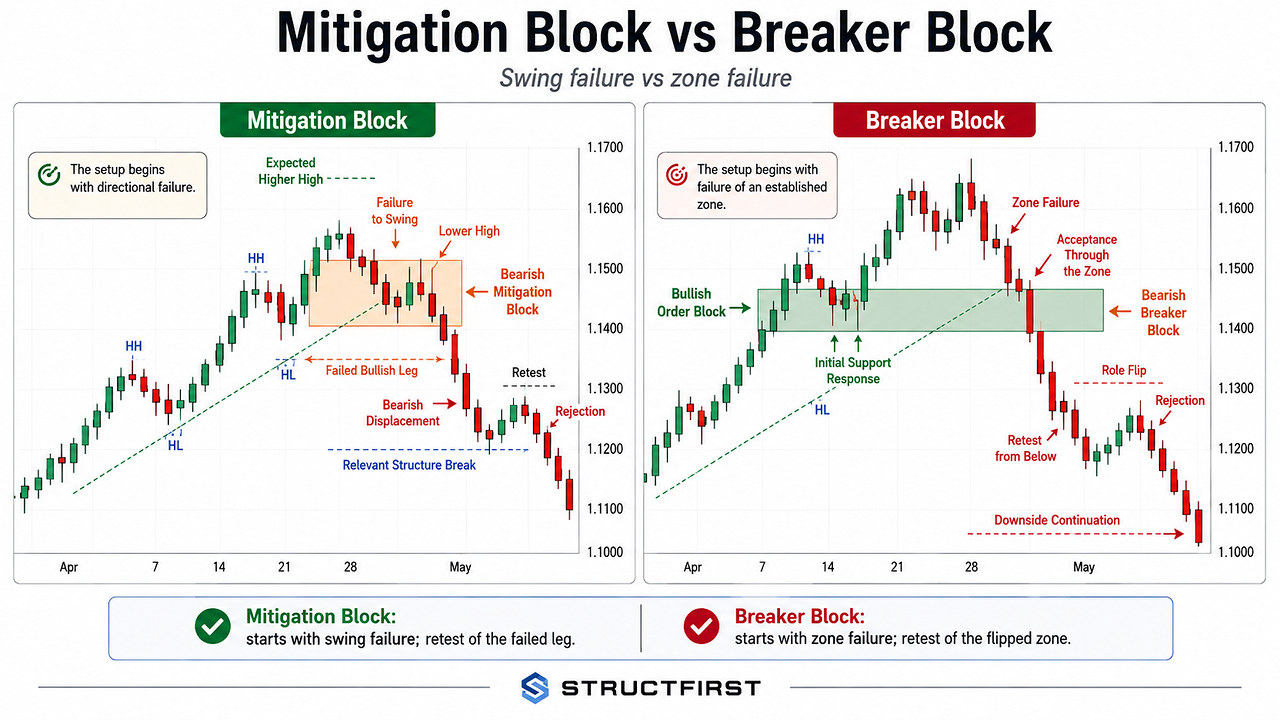
Both setups can produce a retest and continuation in the new direction, but they begin with different structural failures.
The Mitigation Block begins when an expected directional swing fails. Opposite displacement then breaks meaningful structure, and the failed leg becomes relevant during the return.
The Breaker Block begins with failure of an established Order Block or defended zone. Price accepts through the original area and later tests it from the opposite side.
The distinction is not the visual shape of the rectangle.
It is whether the setup began with swing failure or zone failure.
10. Which Candle or Price Area Should Be Marked?
There is no universal rectangle that fits every Mitigation Block.
Possible references include:
- The entire failed directional leg.
- The origin of the failed rally or decline.
- The final opposing candle before opposite displacement.
- A small base formed before the structural break.
- The price area between the failed high or low and the broken supporting swing.
The purpose is not to draw the smallest possible rectangle.
The purpose is to define an area where acceptance, rejection, and invalidation can be evaluated objectively.
A practical process is:
- Mark the failed directional leg broadly.
- Identify where the opposite displacement began.
- Determine which part of the failed leg produced the relevant structure break.
- Refine only when lower-timeframe structure provides a defensible boundary.
- Preserve the protected high or low that controls the new thesis.
Refinement should reveal structure.
It should not be used to manufacture an attractive stop after the market has shown that a wider area controls the transition.
11. Higher-Timeframe Location and Liquidity Context
A Mitigation Block should not be evaluated as an isolated rectangle.
Bearish Location
A bearish Mitigation Block may carry more relevance when:
- Price is positioned in higher-timeframe Premium.
- Buy-side liquidity has already been accessed.
- The bullish sequence fails to create a meaningful higher high.
- Bearish displacement breaks protected bullish structure.
- Lower liquidity remains available as a logical target.
Bullish Location
A bullish Mitigation Block may carry more relevance when:
- Price is positioned in higher-timeframe Discount.
- Sell-side liquidity has been accessed or tested.
- The bearish sequence fails to create a meaningful lower low.
- Bullish displacement breaks protected bearish structure.
- Upper liquidity remains available as a logical target.
Premium and Discount improve location analysis but do not independently validate the setup.
The complete dealing-range framework is explained in What Are Premium and Discount in Trading? Why the 50% Level Is Not a Buy or Sell Signal.
12. Displacement and Structural Consequence
Failure to swing creates a potential transition.
Displacement determines whether the transition has structural force.
Useful evidence may include:
- Expanded candle bodies.
- Reduced overlap.
- Rapid movement away from the failed swing.
- A Fair Value Gap or visible imbalance.
- A break of a relevant protected high or low.
- Continued trade beyond the broken structure.
- Preservation of the new displacement origin.
A large candle that breaks only micro structure may confirm a local entry failure without confirming an external trend transition.
The complete displacement framework is explained in What Is Displacement in Trading? Why Strong Candles Alone Are Not Enough.
When displacement leaves an imbalance, the FVG may help refine the return area. It remains secondary to the structural sequence that created it. See How to Read a Fair Value Gap in Market Structure.
13. The Retest Provides Location, Not Confirmation
A return to the Mitigation Block is an event.
The response determines whether the area becomes executable.
Confirmed Response
- Price enters the mitigation area.
- Trade fails to establish acceptance through the zone.
- Price displaces away in the transition direction.
- A lower-timeframe swing breaks.
- The new protected structure remains intact.
- Continuation develops toward opposing liquidity.
Temporary Reaction
- A wick or small bounce appears.
- Displacement remains weak.
- No meaningful structure breaks.
- Price returns through the area.
- The reaction fails to produce continued delivery.
Acceptance Through the Area
- Repeated candle bodies trade through the zone.
- The protected swing supporting the transition fails.
- The reclaim is unsuccessful.
- Opposite displacement develops.
- Price continues toward liquidity against the Mitigation Block thesis.
A return to the zone creates location. The response earns the trade.
14. Acceptance and Rejection at a Mitigation Block
The Mitigation Block should be read through acceptance and rejection rather than through touch alone.
Bullish Mitigation Block Rejection
- Price returns into the failed bearish leg.
- Trade fails to sustain below the area.
- The zone is reclaimed.
- Bullish displacement develops.
- A relevant high breaks.
- The protected low remains intact.
Bullish Mitigation Block Failure
- Candle bodies establish acceptance beneath the area.
- The protected low fails.
- The recovery cannot reclaim the zone.
- Bearish displacement resumes.
- Price continues toward lower liquidity.
The same framework applies in reverse to a bearish Mitigation Block.
The full distinction between an initial reaction, rejection, acceptance, and unresolved price action is explained in What Are Acceptance and Rejection in Trading? Why One Wick or Close Is Not Enough.
15. Internal vs External Mitigation Blocks
Internal Mitigation Block
An internal Mitigation Block is connected to a smaller swing failure inside a larger structure.
It may support:
- A lower-timeframe execution model.
- A session reversal or continuation.
- A short-term target toward internal liquidity.
- A local entry invalidation.
Its formation does not automatically reverse the external trend.
External Mitigation Block
An external Mitigation Block is connected to failure of a swing controlling the broader auction.
It may align with:
- A higher-timeframe range boundary.
- An external liquidity event.
- Failure of a protected higher-timeframe high or low.
- A major displacement leg.
- A broader directional transition.
The structural weight of the setup depends on the swing that failed, not on the label placed on the rectangle.
16. Protected Highs and Lows in Mitigation Block Trading
A Mitigation Block thesis requires a protected swing that defines failure.
For a bearish setup, the protected high may be:
- The failed-rally high.
- The high supporting bearish displacement.
- The swing whose recovery would erase the bearish structural consequence.
For a bullish setup, the protected low may be:
- The failed-decline low.
- The low supporting bullish displacement.
- The swing whose failure would erase the bullish structural consequence.
The latest swing is not automatically the protected swing.
The complete framework is explained in What Are Protected Highs and Lows in Trading? Which Swing Actually Invalidates the Trade?.
17. Confirmation Before Entry
A bullish Mitigation Block execution may require:
- A defined bearish structure and expected lower low.
- Failure to complete the lower-low sequence.
- Bullish displacement.
- A break of the lower high supporting bearish delivery.
- A clearly defined failed bearish leg.
- A return to the mitigation area.
- Failure to establish acceptance lower.
- Lower-timeframe bullish confirmation.
- A protected low.
- A clear upper-liquidity target.
- Defined invalidation before entry.
A bearish Mitigation Block requires the corresponding bearish sequence.
A CHoCH may provide early warning, but it should not independently confirm the full setup.
The importance of BOS, CHoCH, and a Market Structure Shift depends on the swing, displacement, acceptance, and follow-through. See BOS vs CHoCH vs Market Structure Shift: What Actually Confirms a Trend Change?.
18. Mitigation Block Invalidation
Bullish Mitigation Block Failure
A bullish thesis may fail when price:
- Establishes candle-body acceptance below the mitigation area.
- Breaks the protected low.
- Erases the bullish displacement origin.
- Fails to reclaim the failed bearish leg.
- Produces renewed bearish displacement.
- Continues toward lower liquidity.
Bearish Mitigation Block Failure
A bearish thesis may fail when price:
- Establishes candle-body acceptance above the mitigation area.
- Recovers the protected high.
- Erases the bearish displacement origin.
- Confirms support above the failed bullish leg.
- Produces bullish displacement.
- Continues toward upper liquidity.
A wick through the zone may represent deeper testing or liquidity access.
Repeated closes, failed reclaim behavior, protected-swing failure, and opposite displacement provide stronger invalidation evidence.
19. A Practical Mitigation Block Execution Framework
Use the complete structural sequence before committing capital:
HTF Structure
→ Liquidity Objective
→ Expected Swing Continuation
→ Failure to Swing
→ Opposite Displacement
→ Relevant Structure Break
→ Mitigation Area
→ Retest
→ Acceptance or Rejection
→ Invalidation
→ Entry
→ Target Liquidity
→ Risk Management
Do not begin by searching for the last opposing candle.
Begin with the failed directional expectation and the structural consequence that followed.
Do not place the stop at an arbitrary nearby swing simply to improve the displayed reward-to-risk ratio.
Identify the protected structure that invalidates the thesis.
If the valid invalidation requires more risk than the account plan permits, no-trade is the professional decision.
20. Common Mitigation Block Trading Mistakes
- Calling every pullback a Mitigation Block. A pullback does not confirm swing failure or structural transition.
- Confusing Order Block mitigation with a Mitigation Block. The terms describe different structural processes.
- Treating Mitigation Blocks and Breakers as identical. One begins with swing failure; the other begins with zone failure.
- Marking the area before structural consequence. Failure to swing remains only an early warning until opposite displacement breaks relevant structure.
- Using only the final opposing candle. The true structural area may include a broader failed leg.
- Entering on the first touch. The return provides location, not confirmation.
- Promoting a wick reaction into confirmed rejection. Displacement and structural consequence remain necessary.
- Ignoring acceptance through the zone. Continued trade on the invalidating side weakens the setup.
- Using an internal setup as proof of an external reversal. Timeframe hierarchy must remain clear.
- Defining targets before failure. A setup without defensible invalidation is not ready for execution.
- Claiming institutional activity as a confirmed fact. Intent must be inferred from observable price behavior.
21. What This Framework Helps You Avoid
- Creating reversal setups inside ordinary trend retracements.
- Entering every return to an opposing candle.
- Confusing three visually similar block concepts.
- Trading before displacement affects meaningful structure.
- Using a reaction as completed confirmation.
- Holding after price accepts through the mitigation area.
- Changing timeframes to defend a failed entry.
- Selecting arbitrary invalidation because the correct structure is too distant.
- Taking a trade when the failed leg cannot be defined clearly.
This framework will not make every Mitigation Block work.
Its purpose is to remove ordinary pullbacks and incomplete transition structures before capital is committed.
22. Practice Drill: Separate Pullbacks From Mitigation Blocks
Review 30 historical BTCUSDT examples and record:
- The higher-timeframe directional structure.
- The next expected higher high or lower low.
- Whether that continuation swing succeeded or failed.
- The liquidity positioned beyond the expected swing.
- Whether opposite displacement developed.
- Which meaningful swing was broken.
- Whether the break was internal or external.
- The failed directional leg.
- The proposed Mitigation Block area.
- Whether price returned to the area.
- Whether the response confirmed rejection, acceptance, or remained unresolved.
- The protected high or low.
- The invalidation visible at the time.
- The next opposing liquidity target.
Classify each example as:
- Ordinary pullback.
- Unconfirmed mitigation candidate.
- Confirmed Mitigation Block.
- Failed Mitigation Block.
- Unresolved / no-trade.
Did the directional swing fail, and did the market create structural consequence before the retest?
23. No-Trade Conditions
No-trade is appropriate when:
- The prior directional structure is unclear.
- The expected continuation swing cannot be defined.
- Failure to swing is ambiguous.
- Opposite displacement is weak or absent.
- No relevant structure break occurs.
- The failed leg cannot be identified consistently.
- The proposed zone sits in the middle of an unresolved range.
- Price has not returned to the area.
- The retest produces only overlapping candles without confirmation.
- Internal and external structure conflict without a defined hierarchy.
- The protected swing is unclear.
- Invalidation is too far relative to the next liquidity target.
- The setup cannot be distinguished from an ordinary pullback, Order Block, or Breaker.
An unclear Mitigation Block does not require a wider rectangle or a wider stop.
It may require no trade.
24. The StructFirst Mitigation Block Decision Framework
Before using a Mitigation Block for execution, ask:
- What higher-timeframe structure controls the setup?
- What higher high or lower low was expected?
- Did the directional continuation actually fail?
- What liquidity event occurred near the failed swing?
- Did opposite displacement develop?
- Which meaningful swing did the displacement break?
- Was that break internal or external?
- Which price area represents the failed directional leg?
- Has price returned to that area?
- Did the return confirm rejection, acceptance, or remain unresolved?
- Which protected high or low controls the thesis?
- What price behavior invalidates the setup?
- Where is the next opposing liquidity target?
- Does the target justify the structural risk?
- Would no-trade be the more professional decision?
Frequently Asked Questions
Is Every Pullback a Mitigation Block?
No. A normal pullback can occur while the original directional structure remains intact. A Mitigation Block requires failure of expected swing continuation, opposite displacement, structural consequence, and a later retest.
Is a Mitigation Block the Same as Order Block Mitigation?
No. Order Block mitigation describes price returning to the original displacement area. A Mitigation Block is connected to a failed directional swing that becomes relevant after opposite structural confirmation.
Is a Mitigation Block the Same as a Breaker Block?
No. A Mitigation Block begins with failure of a directional swing. A Breaker begins with failure and role transition of an established Order Block or structural zone.
Does the First Retest Confirm the Mitigation Block?
No. The retest provides a location where confirmation may develop. The market must still demonstrate rejection, displacement, structural consequence, and a defensible protected swing.
Which Candle Should I Use to Draw the Mitigation Block?
There is no universal candle rule. Begin with the failed directional leg and the origin of the opposite displacement. Refine only when lower-timeframe structure provides a clear and defensible boundary.
Can a Mitigation Block Fail?
Yes. Acceptance through the mitigation area, loss of the protected swing, failed reclaim behavior, and opposite continuation can invalidate the setup.
Continue the Learning Path
- Why Market Structure Comes First: The StructFirst Trading Framework
- What Is a Liquidity Sweep? Confirmation, Failure, and Execution
- What Is Displacement in Trading? Why Strong Candles Alone Are Not Enough
- Internal vs External Market Structure: Which Swing Actually Controls the Trend?
- What Is an Order Block in Trading? Why the Last Opposing Candle Is Not Enough
- What Are Premium and Discount in Trading? Why the 50% Level Is Not a Buy or Sell Signal
- What Are Protected Highs and Lows in Trading? Which Swing Actually Invalidates the Trade?
- What Are Acceptance and Rejection in Trading? Why One Wick or Close Is Not Enough
- How to Read a Fair Value Gap in Market Structure
- BOS vs CHoCH vs Market Structure Shift: What Actually Confirms a Trend Change?
Expand Your Structural Edge
A Mitigation Block is not created by the shape of a pullback.
It begins when expected directional continuation fails.
Opposite displacement must then break meaningful structure.
The failed leg may become a useful execution location when price returns, but the return does not complete the trade.
Acceptance or rejection determines whether the area remains structurally relevant.
The protected swing defines failure.
The next liquidity pool defines the objective.
When those elements do not align, the correct label may be ordinary pullback—or no-trade.
Track the live order flow and volume footprint yourself directly on TradingView.
Leave a Reply