StructFirst Core Guide #008
Order Blocks are among the most frequently marked—and most frequently misunderstood—areas on a trading chart.
A common definition describes a bullish Order Block as the final bearish candle before an upward move and a bearish Order Block as the final bullish candle before a decline.
That description may help identify a candidate area, but it is not enough to validate the zone.
Every chart contains opposing candles before directional movement. If each one is treated as an Order Block, the chart quickly becomes covered with rectangles that have no clear hierarchy, no defined failure condition, and no connection to the liquidity the market is actually pursuing.
A structurally relevant Order Block requires more than candle direction.
It should be evaluated through:
Higher-Timeframe Structure
→ Liquidity Location
→ Displacement
→ Structural Consequence
→ Mitigation Response
→ Invalidation
→ Execution
An Order Block is therefore not an automatic entry signal. It is a potential execution location that becomes useful only after the surrounding structure supports the idea.
1. The Key Problem
The main problem with Order Block trading is not that traders cannot find the final opposing candle.
They find too many.
A bearish candle appears before almost every short-term rally. A bullish candle appears before almost every short-term decline. Most of those candles do not produce a meaningful change in delivery, break an important swing, or remain relevant when price returns.
Marking them all creates several problems:
- Minor candles are given the same importance as higher-timeframe decision zones.
- Weak reactions are confused with genuine displacement.
- Internal structure is mistaken for an external trend change.
- Already-consumed areas are treated as fresh.
- Invalidation is placed around the rectangle rather than around the trade thesis.
The correct question is not:
Is this the final opposing candle?
The correct questions are:
Where is the candle located within higher-timeframe structure?
What liquidity event occurred before the move?
Did the move produce genuine displacement?
Which meaningful swing was broken?
What must happen when price returns?
What market behavior would prove that the zone has failed?
This distinction follows the broader process established in Why Market Structure Comes First: The StructFirst Trading Framework.
The Order Block should not create the directional thesis. It should refine a thesis that has already earned structural support.
2. What an Order Block Actually Is
An Order Block can be defined more carefully as:
An Order Block is a price area associated with the origin of a structurally meaningful move that displaced price, changed delivery, and left a testable failure condition.
This definition avoids two common assumptions.
First, the candle itself does not prove that a specific institution placed orders there. Public chart data does not reveal the complete identity, intention, or inventory of every participant.
Second, the area does not become valid merely because price later moved away from it.
A move can occur because of ordinary volatility, thin liquidity, short covering, liquidation, news, or a temporary imbalance. Structural relevance depends on the result produced by the movement.
A useful Order Block candidate should be connected to observable evidence:
- Price was positioned at a meaningful structural location.
- Identifiable liquidity was accessed or defended.
- Price displaced away from the area.
- The displacement affected a relevant swing.
- The origin created a logical level against which failure could later be measured.
The candle is therefore a reference area, not proof of hidden participant intent.
3. The Five Requirements of a Structurally Relevant Order Block
No single requirement independently validates every Order Block. The strongest candidates usually combine five elements.
3.1 Location
Location determines whether the area matters.
An Order Block located near a higher-timeframe range boundary, external liquidity pool, prior swing, premium or discount extreme, or previously defended structure carries more analytical value than a small opposing candle in the middle of an unresolved range.
Location should be evaluated before candle shape.
A technically clean lower-timeframe Order Block may still offer poor execution when it forms:
- At equilibrium.
- Directly into opposing liquidity.
- Against the controlling higher-timeframe structure.
- After most of the expected movement has already occurred.
The area should answer a structural need. It should not be selected simply because it is visually convenient.
3.2 Liquidity Interaction
The movement should be connected to a meaningful liquidity event.
For a bullish Order Block candidate, price may first trade beneath a visible low, test a range boundary, or induce selling before recovering.
For a bearish candidate, price may first trade above a visible high, access external buy-side liquidity, or fail beyond resistance.
A liquidity sweep alone does not validate an Order Block. Price may reverse, continue, or establish acceptance beyond the boundary. The subsequent response determines the meaning of the event.
That distinction is examined in What Is a Liquidity Sweep? Confirmation, Failure, and Execution.
3.3 Displacement
The move away from the area should demonstrate more than a temporary reaction.
Useful displacement may include:
- Expanded candle bodies.
- Limited overlap.
- Decisive movement away from the origin.
- An imbalance or Fair Value Gap.
- A break through a relevant swing.
- Continued acceptance in the direction of the move.
One large candle is not automatically sufficient. The market must create a structural consequence rather than merely display volatility.
3.4 Structural Consequence
The movement should affect a swing that matters to the planned trade.
Breaking a minor internal pivot may be enough for a short-term execution model, but it does not automatically validate a major reversal or higher-timeframe Order Block.
The analyst should identify:
- Which swing was broken.
- Whether that swing was internal or external.
- Whether the break occurred through a wick or candle-body acceptance.
- Whether the market held beyond the broken structure.
Without a meaningful structural result, the opposing candle remains only a reaction origin.
3.5 Defensible Invalidation
A valid trading thesis requires a clear failure condition.
For a bullish Order Block, failure may involve sustained candle-body acceptance beneath the zone, loss of the displacement origin, or a break of the protected low supporting the bullish repricing.
For a bearish Order Block, failure may involve acceptance above the area, recovery of the protected high, or conversion of the supposed supply zone into support.
Invalidation should explain why the idea no longer works. It should not be placed at an arbitrary distance simply to create a preferred reward-to-risk ratio.
4. How a Bullish Order Block Forms
A bullish Order Block candidate usually develops through a sequence rather than a single candle.
A common structural sequence is:
Sell-Side Liquidity Interaction
→ Bullish Displacement
→ Relevant Structure Break
→ Return Toward the Origin
→ Confirmed Rejection or Acceptance Test
The final bearish candle before the displacement may contain the origin of the move, but its direction does not validate it.
The analyst should first examine what occurred before the rally.
- Did price sweep a visible low?
- Did selling fail to establish acceptance below support?
- Was the zone located in higher-timeframe discount or near the lower boundary of a range?
The next question concerns the rally itself.
- Did price displace through relevant resistance?
- Did the move leave an imbalance?
- Did follow-through preserve the newly created bullish structure?
Only after those questions are answered should the final bearish candle—or the broader base surrounding it—be treated as a potential bullish Order Block.
How Should the Bullish Zone Be Drawn?
There is no universal boundary that works for every market and timeframe.
Possible methods include:
- The full high-to-low range of the final bearish candle.
- The candle body.
- The open-to-low portion.
- A multi-candle base containing the actual displacement origin.
The correct boundary should be chosen according to the structural evidence and execution timeframe.
Beginning with the full candle range may preserve context. A lower timeframe can later refine the area when precision is needed.
Refinement should not be used to manufacture a smaller stop after the market has already shown that the wider structure controls the move.
5. How a Bearish Order Block Forms
The bearish sequence is the structural opposite:
Buy-Side Liquidity Interaction
→ Bearish Displacement
→ Relevant Structure Break
→ Return Toward the Origin
→ Confirmed Rejection or Acceptance Test
A final bullish candle before a decline is only a candidate.
The analyst should determine whether price first accessed meaningful buy-side liquidity or failed beyond a range boundary.
The decline should then demonstrate actual bearish repricing:
- Decisive movement away from the origin.
- A break of a relevant low.
- Sustained trade below the broken structure.
- A protected high that can be used to define failure.
A bullish candle in the middle of a downtrend may precede another decline without representing a meaningful Order Block. It may simply be part of ordinary continuation.
The area becomes more relevant when its location and the subsequent structural result support the same bearish thesis.
How Should the Bearish Zone Be Drawn?
Possible boundaries include the full range of the final bullish candle, its body, the open-to-high portion, or the broader base from which bearish displacement began.
A narrow body-only zone may provide precision, but it can also exclude the wick where the actual liquidity interaction occurred. A full-candle zone preserves more context but may require wider invalidation.
The purpose is not to draw the smallest possible rectangle. The purpose is to define the area whose acceptance or rejection can test the thesis.
6. Order Block vs an Ordinary Opposing Candle
The difference between an ordinary opposing candle and a structurally relevant Order Block can be summarized as follows.
| Ordinary Opposing Candle | Structurally Relevant Order Block |
|---|---|
| Appears before a directional move | Sits at the origin of a meaningful repricing event |
| May form anywhere on the chart | Has relevant higher-timeframe location |
| May have no liquidity interaction | Connects to identifiable liquidity or a defended boundary |
| Produces only a temporary reaction | Produces displacement and structural consequence |
| May break only minor noise | Affects a swing relevant to the planned trade |
| Has no clear failure logic | Creates a defensible invalidation condition |
| Can be repeatedly crossed | Should demonstrate rejection or fail through acceptance |
| Is selected by candle color | Is evaluated through structure, liquidity, and response |
The candle direction helps locate a candidate. The market response determines whether the candidate deserves continued attention.
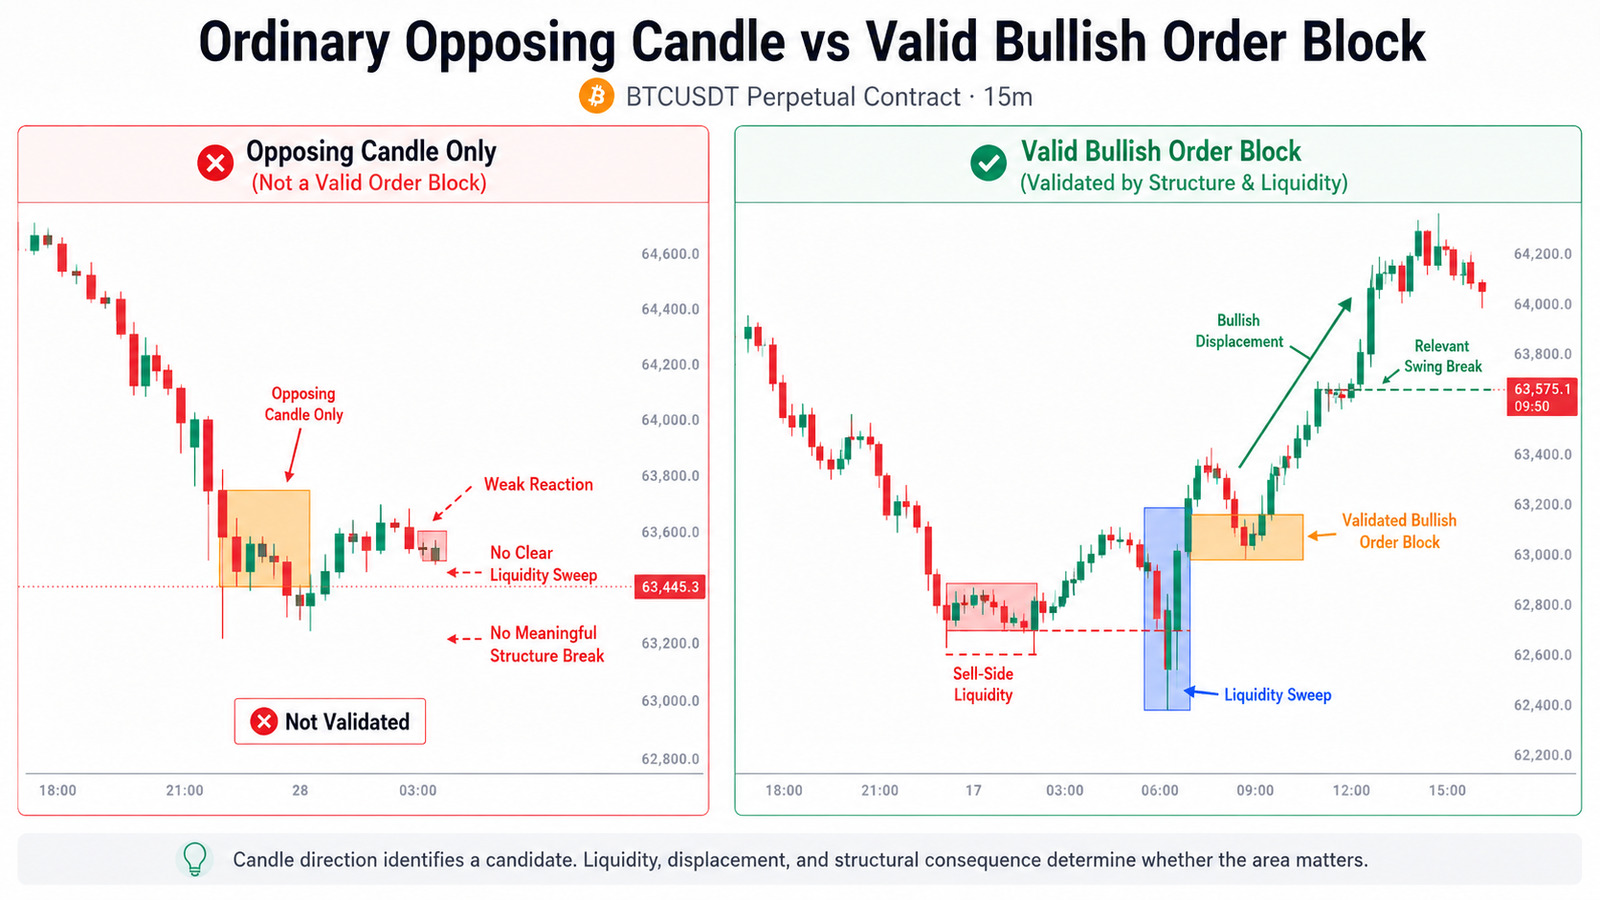
Both examples contain a bearish candle before an upward move, but only one creates a structurally meaningful result.
In the first example, price reacts higher without processing identifiable liquidity or breaking a swing that matters to the planned trade. The candle can be marked visually, but it has not earned structural relevance.
In the validated example, price first accesses sell-side liquidity and then displaces through a relevant swing. The movement creates a testable origin and a clear condition against which mitigation and failure can later be measured.
The difference is not the color of the candle. It is the sequence of liquidity, displacement, structural consequence, and confirmation.
7. Order Blocks and Displacement
The Order Block should not be identified first and justified afterward.
The more disciplined process begins with displacement.
- Did price reprice decisively away from the area?
- Did candle bodies close through relevant structure?
- Was overlap reduced?
- Did the movement leave an imbalance?
- Did follow-through preserve the move?
- Was the origin later defended?
A strong candle can be visually impressive without creating a durable change in control.
For example, price may move sharply above a minor internal high and immediately return. The movement displayed range expansion, but it did not create acceptance or protect the origin.
That distinction is examined in What Is Displacement in Trading? Why Strong Candles Alone Are Not Enough.
A structurally relevant bullish Order Block should be associated with bullish displacement that changes delivery and remains defensible.
A bearish Order Block should be associated with bearish displacement that produces the corresponding structural result.
Without displacement, the area may still generate a reaction. It has not yet earned the same analytical weight.
8. Order Block vs Fair Value Gap
Order Blocks and Fair Value Gaps are related, but they are not interchangeable.
An Order Block identifies a potential origin or decision area associated with a meaningful move.
A Fair Value Gap identifies an imbalance created when price moves rapidly and leaves limited two-sided trade within a three-candle sequence.
| Order Block | Fair Value Gap |
|---|---|
| References the origin of displacement | References the inefficiency left by displacement |
| Often includes one candle or a small base | Uses a three-candle relationship |
| Tests whether the origin remains defended | Tests whether price accepts or rejects the imbalance |
| May provide a broader invalidation area | May provide a more precise retracement area |
| Can remain relevant after partial mitigation | Can be partially or fully rebalanced |
The two may overlap.
A bullish Order Block may sit immediately below a bullish FVG. Price may return through part of the FVG before reaching the Order Block, then displace higher.
A bearish Order Block may overlap the upper portion of a bearish FVG. Price may mitigate the imbalance and test the origin of the decline during the same retracement.
This overlap can create confluence, but confluence does not eliminate the need for confirmation.
A price touch does not prove that the zone held.
The full FVG framework is explained in How to Read a Fair Value Gap in Market Structure.
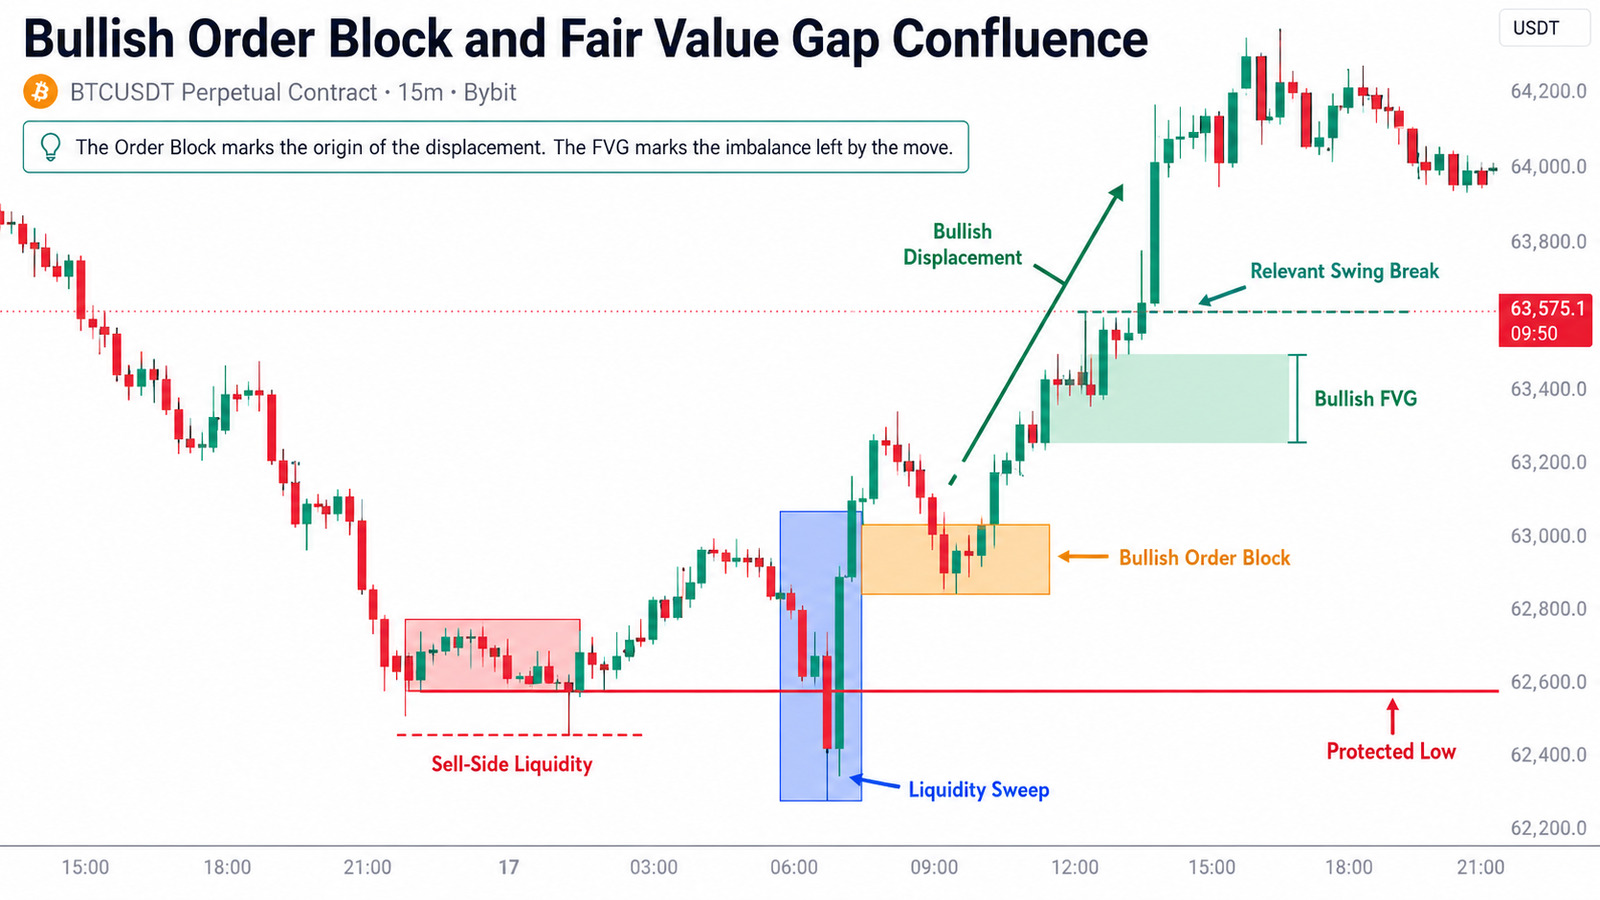
The Order Block and the Fair Value Gap develop from the same bullish delivery sequence, but they describe different parts of that sequence.
The Order Block identifies the origin from which price repriced. The FVG identifies the inefficiency left as price moved rapidly away from that origin.
Price may rebalance the FVG before reaching the Order Block, or it may trade more deeply toward the displacement origin before producing a valid response. Neither location creates an automatic entry.
Confirmation still requires displacement away from the area, a meaningful structural result, and preservation of the protected low. Acceptance beneath that structure would invalidate the bullish thesis even if price initially reacted from the zone.
9. Higher-Timeframe vs Lower-Timeframe Order Blocks
Timeframe hierarchy determines how an Order Block should be used.
A Daily, 12-hour, or four-hour Order Block may help define a broader decision location. A 15-minute or five-minute Order Block may help refine execution within that area.
The lower-timeframe zone does not automatically carry the same structural weight.
A five-minute Order Block can fail while the four-hour bullish thesis remains intact. The entry model may be invalidated without the broader scenario being disproved.
The reverse is also important.
A precise five-minute bullish Order Block cannot repair a poor higher-timeframe location. If price is trading in higher-timeframe premium directly beneath external buy-side liquidity and major resistance, lower-timeframe precision does not remove that structural conflict.
Lower-timeframe precision cannot repair a higher-timeframe location problem.
Before grading an Order Block, determine which swing controls the broader auction. The hierarchy between internal and external swings is explained in Internal vs External Market Structure: Which Swing Actually Controls the Trend?
A practical multi-timeframe process may look like this:
- Daily or 12H: Define the larger environment and external liquidity.
- 4H or 1H: Locate the relevant decision area and displacement origin.
- 15M or 5M: Observe mitigation, confirmation, and execution failure.
The exact timeframes can change. The hierarchy should remain consistent.
10. Mitigation: What Happens When Price Returns?
Mitigation describes price returning to an area associated with the earlier displacement.
The return may rebalance an inefficiency, test remaining interest, allow participants to reduce exposure, or simply revisit the origin as part of ordinary auction behavior.
The chart does not reveal a complete inventory ledger. The analyst should focus on the visible response.
Immediate Rejection
Price enters the edge of the zone and quickly displaces away.
This is visually strong, but the reaction must still affect relevant structure before it becomes executable confirmation.
Partial Mitigation
Price enters only part of the Order Block before reacting.
The untouched portion may remain relevant, but the analyst should not assume that every remaining price level contains unfilled institutional orders.
Deep Mitigation
Price trades through most of the zone before rejecting near the opposite boundary.
Deep mitigation does not automatically invalidate the area. The meaning depends on candle-body acceptance, the protected swing, and the subsequent response.
Temporary Reaction Followed by Failure
Price initially bounces or rejects, creating the appearance that the Order Block held. The reaction then fails to produce displacement, and price returns through the zone.
This is one of the most common traps.
A reaction is not the same as confirmed defense.
Full Acceptance Through the Zone
Price trades through the area, closes beyond it, and continues building value on the opposite side.
This behavior weakens or invalidates the original Order Block thesis, particularly when the displacement origin and protected swing are also lost.
The first mitigation may offer a cleaner response than later tests because the zone has not yet been repeatedly traded.
However, freshness alone does not validate an Order Block. A fresh zone in poor location with weak displacement remains a weak zone.
11. Confirmation at an Order Block
An Order Block is a location where confirmation may develop.
It is not confirmation itself.
For a bullish Order Block, useful evidence may include:
- A sweep or failed breakdown within the zone.
- Bullish displacement away from the area.
- A break of relevant internal bearish structure.
- Preservation of the new displacement origin.
- A successful retest.
- Continued acceptance above the reclaimed level.
For a bearish Order Block, the same logic applies in reverse.
A lower-timeframe CHoCH can show that the immediate sequence has changed, but it should not automatically be promoted into proof that the entire higher-timeframe trend reversed.
The significance of a structural break depends on:
- The timeframe.
- The swing that was broken.
- The location of the event.
- The quality of displacement.
- What price does after the break.
The differences between BOS, CHoCH, and a genuine Market Structure Shift are explained in BOS vs CHoCH vs Market Structure Shift: What Actually Confirms a Trend Change?
The confirmation requirement should also match the trade being attempted.
A short-term continuation trade may require only lower-timeframe evidence within an aligned higher-timeframe structure. A countertrend swing trade should require stronger proof because it challenges the controlling market direction.
12. Order Block Invalidation
Invalidation identifies the condition that proves the original reason for using the Order Block no longer exists.
It is not always the first wick beyond the rectangle.
Bullish Order Block Invalidation
A bullish thesis may be invalidated when price:
- Establishes candle-body acceptance beneath the Order Block.
- Breaks the protected low supporting the bullish displacement.
- Erases the displacement origin.
- Fails to recover the area after trading below it.
- Retests the zone from underneath and confirms it as resistance.
Bearish Order Block Invalidation
A bearish thesis may be invalidated when price:
- Establishes candle-body acceptance above the Order Block.
- Recovers the protected high.
- Erases the bearish displacement origin.
- Fails to return below the zone.
- Retests the area from above and confirms it as support.
Wick Penetration vs Acceptance
A wick through the boundary may indicate liquidity access, volatility, or deeper mitigation.
It does not independently confirm failure.
Acceptance is stronger evidence. It may include:
- Repeated candle-body closes beyond the zone.
- Continued trade on the invalidating side.
- Successful retests of the former boundary.
- Structural progression away from the original thesis.
The exact stop-loss may be placed beyond a technical boundary according to the execution plan. Structural invalidation is the market behavior showing that the thesis failed.
Those two references should be related, but they are not conceptually identical.
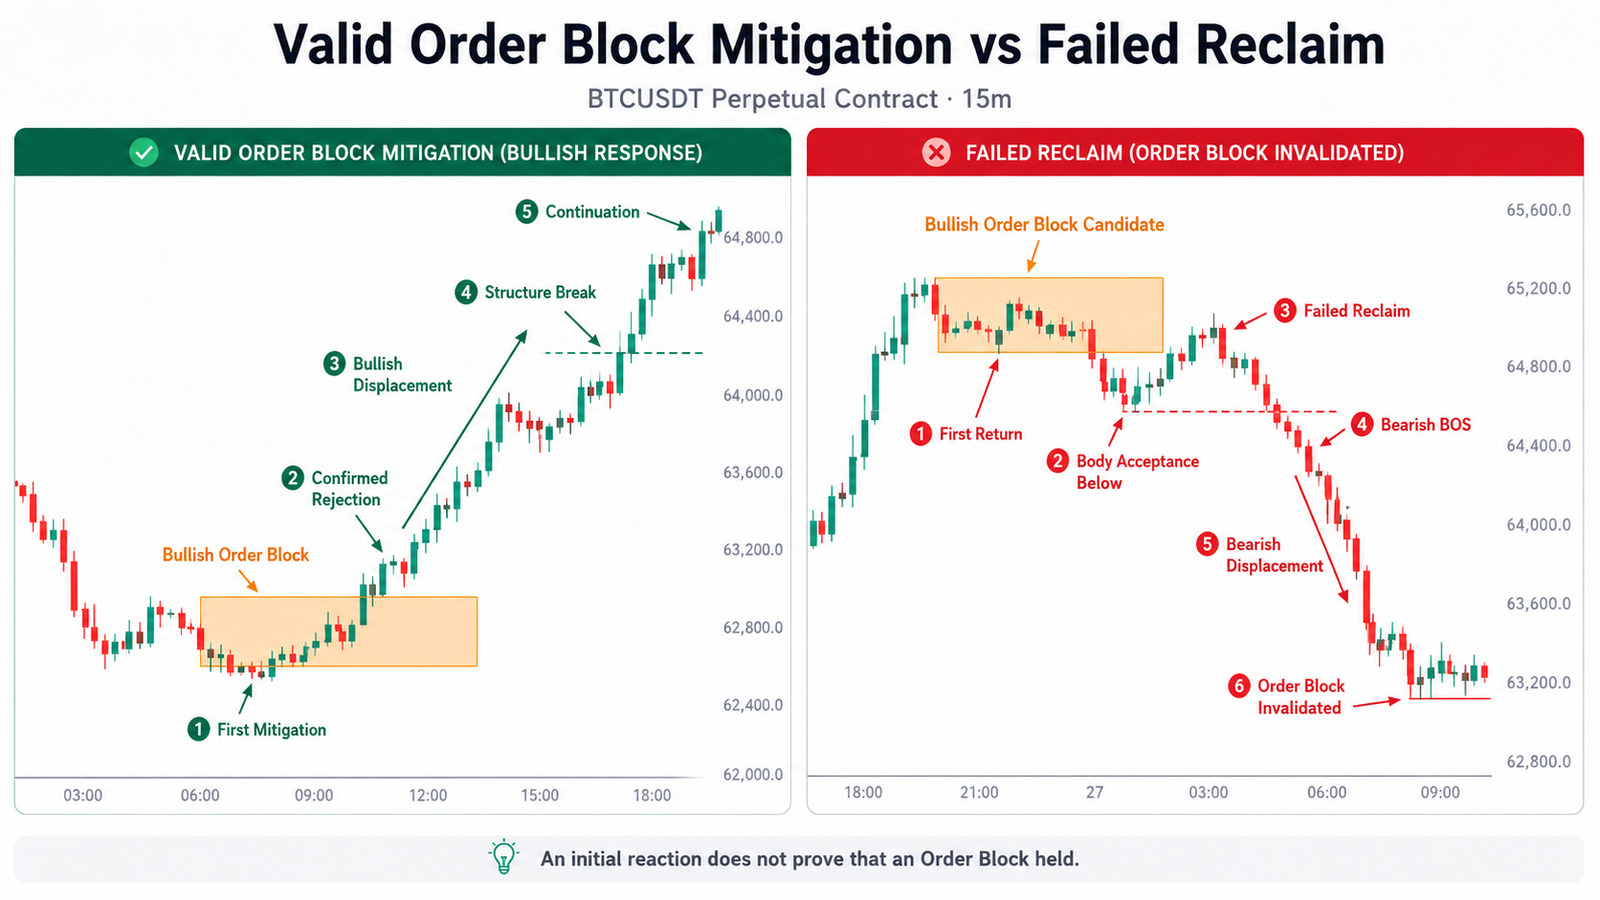
Both examples begin with a price area associated with bullish delivery, but the return produces different structural outcomes.
In the valid example, first mitigation is followed by confirmed rejection, bullish displacement, a relevant structure break, and continuation. Price demonstrates that the origin remains structurally relevant.
In the failed example, price returns through the candidate zone and establishes candle-body acceptance beneath it. The subsequent rebound cannot reclaim the former support area, and bearish displacement confirms continuation lower.
The distinction is not whether price reacted temporarily. It is whether the response preserved structure or confirmed failure through acceptance and an unsuccessful reclaim.
This distinction should be evaluated through acceptance and rejection rather than through the first wick or reaction alone. Continued trade through the zone, a failed reclaim, or displacement away from the area determines whether the Order Block remained valid or failed. For the complete framework, read What Are Acceptance and Rejection in Trading? Why One Wick or Close Is Not Enough.
13. When an Order Block Becomes a Breaker
A failed Order Block does not automatically become a Breaker.
Failure is only the first condition.
For a former Order Block to become a useful Breaker candidate, price should generally:
- Invalidate the original Order Block thesis.
- Establish acceptance on the opposite side.
- Create a structural consequence in the new direction.
- Return to the failed area.
- Confirm that the zone changed function.
For example, a bullish Order Block may fail as price breaks through it and accepts lower. When price later retests the same area from underneath, the zone may act as resistance.
That role transition may support a bearish Breaker interpretation.
The reverse applies to a failed bearish Order Block that is later reclaimed and tested as support.
The key is not the label. The key is the confirmed transition from:
Expected Support
→ Structural Failure
→ Lower Acceptance
→ Resistance on Retest
or:
Expected Resistance
→ Structural Failure
→ Higher Acceptance
→ Support on Retest
The complete distinction between a failed Order Block and a confirmed Breaker will be developed in the Proposed Guide: What Is a Breaker Block in Trading?
Until the role transition is confirmed, the area should be described as a failed Order Block rather than automatically relabeled.
A historical example of supply, structural weakness, and confirmed markdown can be examined in Bitcoin Wyckoff Redistribution: How the 6H Structure Confirmed Markdown.
The value of that example is not the presence of a single candle rectangle. It is the sequence of range development, failed strength, displacement, structural weakness, and continuation.
14. A Practical Order Block Execution Framework
Step 1: Define the Higher-Timeframe Structure
Determine whether the controlling market is trending, ranging, accumulating, distributing, or structurally unresolved.
Identify the external highs, lows, and range boundaries before searching for an execution area.
Step 2: Mark the Relevant Liquidity
Define the liquidity that price may be seeking and the liquidity event that would support the thesis.
An Order Block without a clear liquidity narrative can become an isolated rectangle with no objective function.
Step 3: Identify the Displacement
Find the move that actually changed delivery.
Do not begin by marking every opposing candle. Begin with the structural movement, then trace the move back to its origin.
Step 4: Grade the Order Block Location
Ask whether the origin aligns with the controlling structure, a range boundary, premium or discount, external or internal liquidity, and the next target.
Step 5: Define the Required Confirmation
Decide in advance what price must show during mitigation.
This may include displacement, a meaningful structural break, a failed reclaim, or acceptance away from the zone.
Step 6: Define Invalidation
Identify the price behavior that proves the Order Block thesis failed.
Invalidation should be defined before targets and position size.
Step 7: Evaluate the Next Liquidity Target
The target should be an opposing liquidity objective supported by structure.
A nearby target may not justify the required invalidation distance.
Step 8: Execute Only When the Structure Is Complete
The final sequence is:
HTF Structure
→ Liquidity
→ Order Block Location
→ Mitigation
→ Confirmation
→ Invalidation
→ Entry
→ Target Liquidity
→ Risk Management
The Order Block is one component of execution. It is not the entire trade.
15. Common Order Block Trading Mistakes
Marking Every Final Opposing Candle
This creates a chart full of zones without hierarchy.
The trader should trace meaningful displacement back to its origin rather than search forward from every opposing candle.
Ignoring Structural Location
A clean Order Block in the middle of a range may offer poor asymmetry and no clear target.
Location determines relevance.
Accepting Weak Movement as Displacement
A temporary bounce or decline may not alter meaningful structure.
Without structural consequence, the origin remains unconfirmed.
Treating the First Touch as an Automatic Entry
Price entering the zone is an event. The response provides confirmation or failure.
Ignoring Previous Mitigation
Repeated tests can reduce the clarity of the zone and indicate that price is building acceptance through it.
A previously mitigated Order Block should not automatically be treated as fresh.
Refining the Zone Until the Stop Looks Attractive
Lower-timeframe refinement should reveal useful structure.
It should not be used to create an artificially narrow invalidation that the controlling timeframe does not support.
Promoting a Minor CHoCH Into a Trend Reversal
A local change may confirm a reaction without reversing the higher-timeframe market.
Calling Every Failed Order Block a Breaker
A Breaker requires confirmed failure, acceptance, and role transition.
Defining Targets Before Failure
A projected target has limited value when the trader cannot explain what invalidates the Order Block thesis.
16. No-Trade Conditions
No-trade is appropriate when:
- The displacement origin cannot be identified clearly.
- No relevant liquidity interaction preceded the move.
- The supposed displacement failed to affect meaningful structure.
- The Order Block is located in the middle of an unresolved range.
- The zone has already been mitigated repeatedly.
- Price is establishing acceptance through the area.
- Higher-timeframe structure conflicts with the proposed trade.
- Confirmation depends only on a minor CHoCH.
- Invalidation is unclear.
- Invalidation is too wide relative to the next liquidity target.
- The efficient entry has already passed.
- The analysis depends more on the Order Block label than on observable market behavior.
An unclear Order Block is not a requirement to trade with a wider stop.
It is a reason to remain flat.
17. The StructFirst Order Block Decision Framework
Before using an Order Block for execution, ask:
- What is the controlling higher-timeframe structure?
- Is the zone located near meaningful liquidity or a range boundary?
- What liquidity event preceded the displacement?
- Did price produce genuine displacement or only a temporary reaction?
- Which swing was broken?
- Was that swing internal or external?
- Does the Order Block represent the actual origin of the move?
- Is the zone fresh, partially mitigated, or repeatedly tested?
- What response would confirm rejection?
- What candle-body acceptance would confirm failure?
- Which swing must remain protected?
- Is the next liquidity target far enough to justify the required risk?
- Does the entry require lower-timeframe confirmation?
- Would no-trade be the more professional decision?
A zone that cannot answer these questions is not ready for execution.
Frequently Asked Questions
Is the Last Bearish Candle Before a Rally Always a Bullish Order Block?
No.
It is only a candidate. The subsequent move should connect to meaningful location, liquidity, displacement, structural consequence, and a clear failure condition.
Is the Last Bullish Candle Before a Decline Always a Bearish Order Block?
No.
The candle may simply form during ordinary bearish continuation. It becomes more relevant when the decline processes liquidity, displaces price, and breaks a swing that matters.
Should an Order Block Be Drawn Using the Wick or the Candle Body?
There is no universal rule.
The full candle preserves the complete traded range, while body-based or open-to-extreme refinement may improve execution precision. The boundary should reflect the actual displacement origin and the timeframe controlling the trade.
Does Full Mitigation Automatically Invalidate an Order Block?
Not necessarily.
Price may trade deeply into the area and still reject. Structural failure becomes clearer when price establishes acceptance beyond the zone, loses the protected swing, and confirms continuation on the invalidating side.
Is an Order Block the Same as Supply or Demand?
The concepts may overlap, but they are not always used identically.
Supply and demand zones generally identify areas where price previously moved strongly. An Order Block framework places additional emphasis on liquidity, displacement, structural consequence, mitigation, and invalidation.
Is an Order Block Stronger When It Overlaps a Fair Value Gap?
The overlap may improve location because the origin and imbalance are aligned.
It does not guarantee a reaction. Price must still confirm rejection, preserve the relevant structure, and provide acceptable risk relative to the next liquidity target.
Can a Failed Order Block Be Traded as a Breaker?
Only after the market confirms the role transition.
Failure alone is insufficient. Price should establish acceptance on the opposite side and confirm the former zone as support or resistance during a retest.
Continue the Learning Path
- What Is Displacement in Trading? Why Strong Candles Alone Are Not Enough
- How to Read a Fair Value Gap in Market Structure
- What Are Acceptance and Rejection in Trading? Why One Wick or Close Is Not Enough
- What Are Protected Highs and Lows in Trading? Which Swing Actually Invalidates the Trade?
- What Is a Mitigation Block in Trading? Why Every Pullback Is Not Mitigation
- What Are Premium and Discount in Trading? Why the 50% Level Is Not a Buy or Sell Signal
Expand Your Structural Edge
An Order Block is not validated by candle color, a rectangle, or the assumption that institutional orders must remain inside the zone.
Its value comes from the structural sequence surrounding it.
Higher-timeframe structure establishes the environment. Liquidity explains the decision location. Displacement demonstrates repricing. The affected swing reveals the structural consequence. Mitigation tests whether the origin remains relevant. Invalidation defines when the thesis failed.
The final opposing candle may help locate the area.
It does not complete the analysis.
Begin with structure. Identify liquidity. Demand displacement. Confirm the response. Define failure before committing risk.
Track the live order flow and volume footprint yourself directly on TradingView.
Leave a Reply